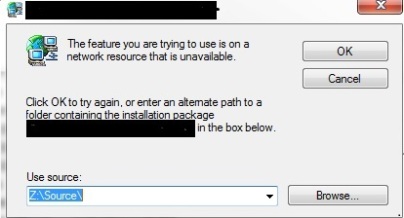
ResolveSource Action , can cause for an uninstal fail.

Image

 Some of the vendor MSI’s which is badly designed will look for the source MSI during uninstall instead of using the cahed MSI.

Most of the cases will be due to the presence of ResolveSource action in the installation sequence.

Unless the MSI itself is badly designed,The original MSI is not needed for uninstall. All MSI files are cached in %WINDIR%\Installer*.* using a random name. This contains the installer structure only, and no files.This MSI file is used for any maintenance and uninstall operations – and it is sufficient for uninstall in the vast majority of cases. The original source is only needed if files need to be copied to disk (for a maintenance install), or the MSI does an explicit request to resolve the original source via the standard action ResolveSource or via a custom action (which shouldn’t be done in a properly authored package).

Ref:MSDN 

The ResolveSource action determines the location of the source and sets the SourceDir property if the source has not been resolved yet.

The ResolveSource action must be called before using the SourceDir property in any expression. It must also be called before attempting to retrieve the value of the SourceDir property using MsiGetProperty. The ResolveSource action should not be executed when the source is unavailable, as it may be when uninstalling the application.

Note: The issue you can replicate by creating an MSI with this ResolveSource action and install with an Admin account from a mapped network drive, and try to uninstall with a SYSTEM account.The source path will be set to the mapped drive during install and as the SYSTEM account may not have the visibility to the mapped drive, the uninstall will fail stating the MSI can not be found. 
 

Fixing the ‘AdminIntegration9.dll missing’ error in Installshiled 2013.

Most of you might be experience the below DLL missing issue while launching the remote Repackager.This is a known issue in Installshield 2013.Dll error

To Fix this, just replace folder name “Repackager” in the Startin path  to ‘Common’

Packaging IE9

Internet Explorer Administration Kit (IEAK) 9 simplifies the creation, deployment, and management of customized Windows Internet Explorer 9 packages. IEAK 9 can be used to configure the out-of-box Internet Explorer 9 experience for your users, and to manage user settings after you deploy Internet Explorer 9.


Ref # http://technet.microsoft.com/en-us/ie/gg615601.aspx

Steps :


1. Install IE 9 on the respective build .

2.Install IEAK .choose the license type’ Internal Distribution via a corporate Intranet’.

3.Run internet Explorer customization wizard 9

4.Select the required options and add\remove features etc..from the wizard.

5.In Media selection, Select ‘File’

5.The output will be an MSI file which will be getting stored in the destination location you have chosen in the wizard.


During Uninstall if you want to retain the previous version use the following command;

FORFILES /P %WINDIR%\SERVICING\PACKAGES  /M Microsoft-InternetExplorer-*9.*.mum /c “cmd /c echo uninstalling package @fname && start /w pkgmgr /up :@fname /norestart”

Win 8 Release preview -Start Menu

Start Menu can be still enabled with Win 8 Release preview.
Here is a free downloadable,http://lee-soft.com/vistart/

World IPv6 Day -June 8th, 2011

imageAn initiative designed to test readiness for the transition to next generation Internet Protocol (IPv6) from the now all but obsolete IPv4.

Read More Here

Windows 8 on October 2012

Good News Friends!

The below article in softpedia by Marius Oiaga gives a heads up that Windows 8  is going to officially release on October 2012.

http://news.softpedia.com/news/Windows-8-Availability-2-to-3-Years-after-Windows-7-205249.shtml


I think the repackagers\build engineers are really enjoying the frequent releases of new OS from Microsoft which makes their job safe and bringing quite lot of opportunities. !!

Last few years repackagers are really having a good time to learn new technologies and most of them enjoying the challenges too.

InPrivate Browsing Using IE 9

InPrivate Browsing helps prevent Internet Explorer from storing data about your browsing session. This includes cookies, temporary Internet files, history, and other data. Toolbars and extensions are disabled by default.

image

You can open a IE window in private mode using the following command.

iexplore -private

Microsoft Windows XP EOS Countdown Timer.gadget

Large number of organizations are still using Windows XP.The end of support of this platform is on 2014.

You can check how many days are remaining using the  gadget from Microsoft.

You can download this gadget by  clicking here.


image

  • Supported Operating Systems:Windows 7;Windows Vista,Windows 7 32-bit or 64-bit, any edition

VB Script : Remove an entry from Hosts File


On Error Resume Next

Set wshshell = createobject("wscript.shell")

Line1="0.0.0.0.0   TEST"
Call RemoveValues(Line1)


Sub RemoveValues(Line)
    Dim varFile         ‘Variable to store the values of the file
    Dim varFileLines    ‘Variable to store the current line read from the file
    Dim WshShell        ‘Object pointing to the WScript
   
    ‘Initializing the WScript object
    Set WshShell = CreateObject("WScript.shell")
    ‘System root
    SysRoot = WshShell.ExpandEnvironmentStrings("%SystemRoot%")
    ‘File Path
    sFileName = SysRoot & "\system32\drivers\etc\Hosts"
  
    Set objFSO = CreateObject("Scripting.FileSystemObject")
    Set objFile = objFSO.OpenTextFile(sFileName, 1)
   
    ‘looping through the Hostss file
    Do Until objFile.AtEndOfStream
        ‘Reading a line from the Hosts file
        varFileLines = objFile.ReadLine
        ‘Checking for the search string
        If Trim(varFileLines) <> Line Then
            ‘Building the string without the search string
            If Trim(varFile) = "" Then
                varFile = Trim(varFileLines)
            Else
                varFile = varFile & vbCrLf & Trim(varFileLines)
            End If
        End If
    Loop
    ‘Closing the file object
    objFile.Close
    Set objFile = Nothing
    ‘Creating the file without the search string
    Set objFile = objFSO.CreateTextFile(sFileName, True, False)
    ‘Writing the lines into the file
    objFile.WriteLine varFile
    ‘Closing the file object
    objFile.Close
    Set objFile = Nothing
End Sub

VB Script:Add an entry in Hosts file

The hosts file is one of several system facilities to assist in addressing network nodes in a computer network.(As per the definition in Wikipedia!)
The hosts file contains lines of text consisting of an IP address in the first text field followed by one or more hostnames.

This file will be present in %SystemRoot%\system32\drivers\etc\


The below script is an example for adding an entry in to the hosts file.

This will append the existing hosts file. The same script can be used for updating the services file by changing the filename in the script.

No shy to say this is a copied script !!. I have modified some lines as per our requirement.


On Error Resume Next

Dim wshshell

Set wshshell = createobject("wscript.shell")

Line1="0.0.0.0  TEST"     ‘Enter the required entry here
Call AddValues(Line1)

Set wshShell = Nothing


Sub AddValues(Line)
    Dim varFile         ‘Variable to store the values of the file
    Dim varFileLines    ‘Variable to store the current line read from the file
    Dim WshShell        ‘Object pointing to the WScript
   
    ‘Initializing the WScript object
    Set WshShell = CreateObject("WScript.shell")
    ‘System root
    SysRoot = WshShell.ExpandEnvironmentStrings("%SystemRoot%")
    ‘File Path
    sFileName = SysRoot & "\system32\drivers\etc\Hosts"
    Set objFSO = CreateObject("Scripting.FileSystemObject")
    Set objFile = objFSO.OpenTextFile(sFileName,1)

    Flag=0
   
    ‘looping through the hosts file
    Do Until objFile.AtEndOfStream
        ‘Reading a line from the hosts file
        varFileLines = objFile.ReadLine
        ‘Checking for the search string
        If Trim(varFileLines) <> Line Then
            ‘Building the string without the search string
            If Trim(varFile) = "" Then
                varFile = Trim(varFileLines)
            Else
                varFile = varFile & vbCrLf & Trim(varFileLines)
            End If
    Else
        Flag=1
        End If
    Loop
    ‘varFile = varFile & vbCrLf & Trim(varFileLines)
     ‘Closing the file object
        objFile.Close
    if Flag=0 then
        ‘varFile = varFile & vbCrLf & Trim(varFileLines) & vbCrLf & Line
        varFile = varFile & vbCrLf & Line
        ‘Creating the file with the search string
        Set objFile = objFSO.CreateTextFile(sFileName, True, False)
        ‘Writing the lines into the file
        objFile.WriteLine varFile
    ‘Closing the file object
    objFile.Close
    end if
    Set objFile = Nothing
End Sub

%~z1

%~z1 – expands %1 to size of file

To get the size of a file in bytes using batch script is very easy.

Open note pad and type in the below commands.

echo %~z1

pause

save the file as test.bat

If you want to get the size of a file ,say “Testmysize.mdb” ,Open cmd.exe and run the below command.

test.bat Testmysize.mdb

It will display the size of Test my size.mdb file in bytes.

Windows 7: Deploying Your Application with Windows Installer (MSI) and ClickOnce

image

If you are a developer involved in the creation of application deployment packages using Windows Installer (MSI) or ClickOnce, this session is for you… I felt this is very interesting talk.Thanks to Tyler Robinson.

http://channel9.msdn.com/blogs/pdc2008/pc42

Internet Explorer Administration Kit (IEAK)

image

The Internet Explorer Administration Kit (IEAK) simplifies the creation, deployment and management of customized Internet Explorer packages. The IEAK can be used to configure the out-of-box Internet Explorer experience or to manage user settings after Internet Explorer deployment.

Read more about this in the below link.

http://technet.microsoft.com/en-us/ie/bb219517

VB Script :Write a binary value in registry

Here I share with a you a sample script to write a binary value in registry.Its not  easy as you write REG_DWORD ,etc .

const HKEY_LOCAL_MACHINE = &H80000002
strKeyPath = "SOFTWARE\test"
strComputer = "."
iValues = Array(&H01) ‘<-Give the value here .

Set oReg=GetObject("winmgmts:{impersonationLevel=impersonate}!\\" & strComputer & "\root\default:StdRegProv")
BinaryValueName = "FailureActions"
oReg.SetBinaryValue HKEY_LOCAL_MACHINE,strKeyPath, BinaryValueName,iValues


Note: For testing this script make sure ‘HKLM\Software\test’ key present already.

Adobe Creative Suite Design Premium CS5

While packaging Adobe Creative Suite Design Premium CS5, you might have noticed that the below “Update available” prompt will be appearing automatically after install of the application. This can be disabled via the below mentioned method.

To disable the below auto prompt from Adobe help.exe

clip_image002

1.check the read-Only check box of state.xml file in %appdata%\chc.4875E02D9FB21EE389F73B8D1702B320485DF8CE.1\Local Store\#ApplicationUpdater

clip_image004

2.Click ok.

To implement this via package, copy\over write this file to the above location via active setup.

Versions of Java which support Windows 7

Here are the versions of Java which support Windows 7:

 1.4: >= 1.4.2_23

 1.5: >= 1.5.0_21

 1.6: >= 1.6.0_14

Difference of Small upgrade and minor upgrade

Small and minor updates are very similar. The only difference is that in a minor update the
product version is increased (in any of the first thee fields), while a small update leaves the
version number unchanged or increases only the fourth field of the number. You can update
your product with a small or minor update package only if the product code is unchanged.
To replace an existing application with a package that has a different product code, a major
upgrade is required.

REINSTALLMODE=vomus

What is the importance of ‘v’ in REINTALLMODE?

msiexec /i test.msi REINSTALLMODE=vomus REINSTALL=ALL

The important part is the "v" in the reinstall mode settings. It forces the use of the new msi
file instead of the cached copy.

If you are upgrading a package with same product code and different package code(ofcurse) use ‘v’ inorder to recache the new msi.

HKEY_USERS (Identifying the SID of current logged in user)

During the troubleshooting of an application to deal with HKCU entries where the current user doesn’t have access to registries, checking the SID of the current user can help you identify the particular hive of the logged in user.

use the command whoami /user

Open the command prompt and enter the above command (In user mode) .The command will display the SID of the current logged in user.

open the registry with admin user and check the hive under HKEY_Users with the displayed SID.Delete or add the registry to  troubleshoot the application.

Setting permission for empty folder without empty component

Step 1:Create the empty folder in the required location using “New folder “ option.

clip_image002

For eg: I have used ‘BalsaTest’ folder in [ProgramFileFolder]

clip_image004

An Empty component will be getting created for this folder.

Note : Removing this empty component “AllOtherFiles” while giving permission via lockpermission table is the aim of this exercise.

clip_image006

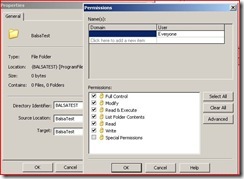
Step 2: Set the required permission for the folder as below

clip_image008

Folder will appear with Lock icon after giving the permission

clip_image010

Lock Permission table will appear as below

clip_image012

Directory table entry as below

clip_image014

Createfolder table entry will be as below

clip_image016

We need to apply the tweak in createfolder.

Step 3:

Change the component to any other existing component in the package which is not empty.(Best practice is to give on the mainexe’s component)

clip_image018

Nothing to worry about the path of the mainexe component and the empty folder, Even the empty folder is getting created in different location .

The Parent folder mentioned in directory table will help the folder to get install on the required location.

Step 4: Delete the ‘AllOtherFiles’ componet from feature

clip_image020

clip_image022

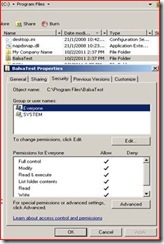
Done!.Compile and install the MSI. Permission will be applied as below.

clip_image024


Enter your email address to subscribe to this blog and receive notifications of new posts by email.

Join 99 other subscribers

Blog Stats...

  • 121,690 hits